HOW TO INSTALL PPF ON A TOOLBOX
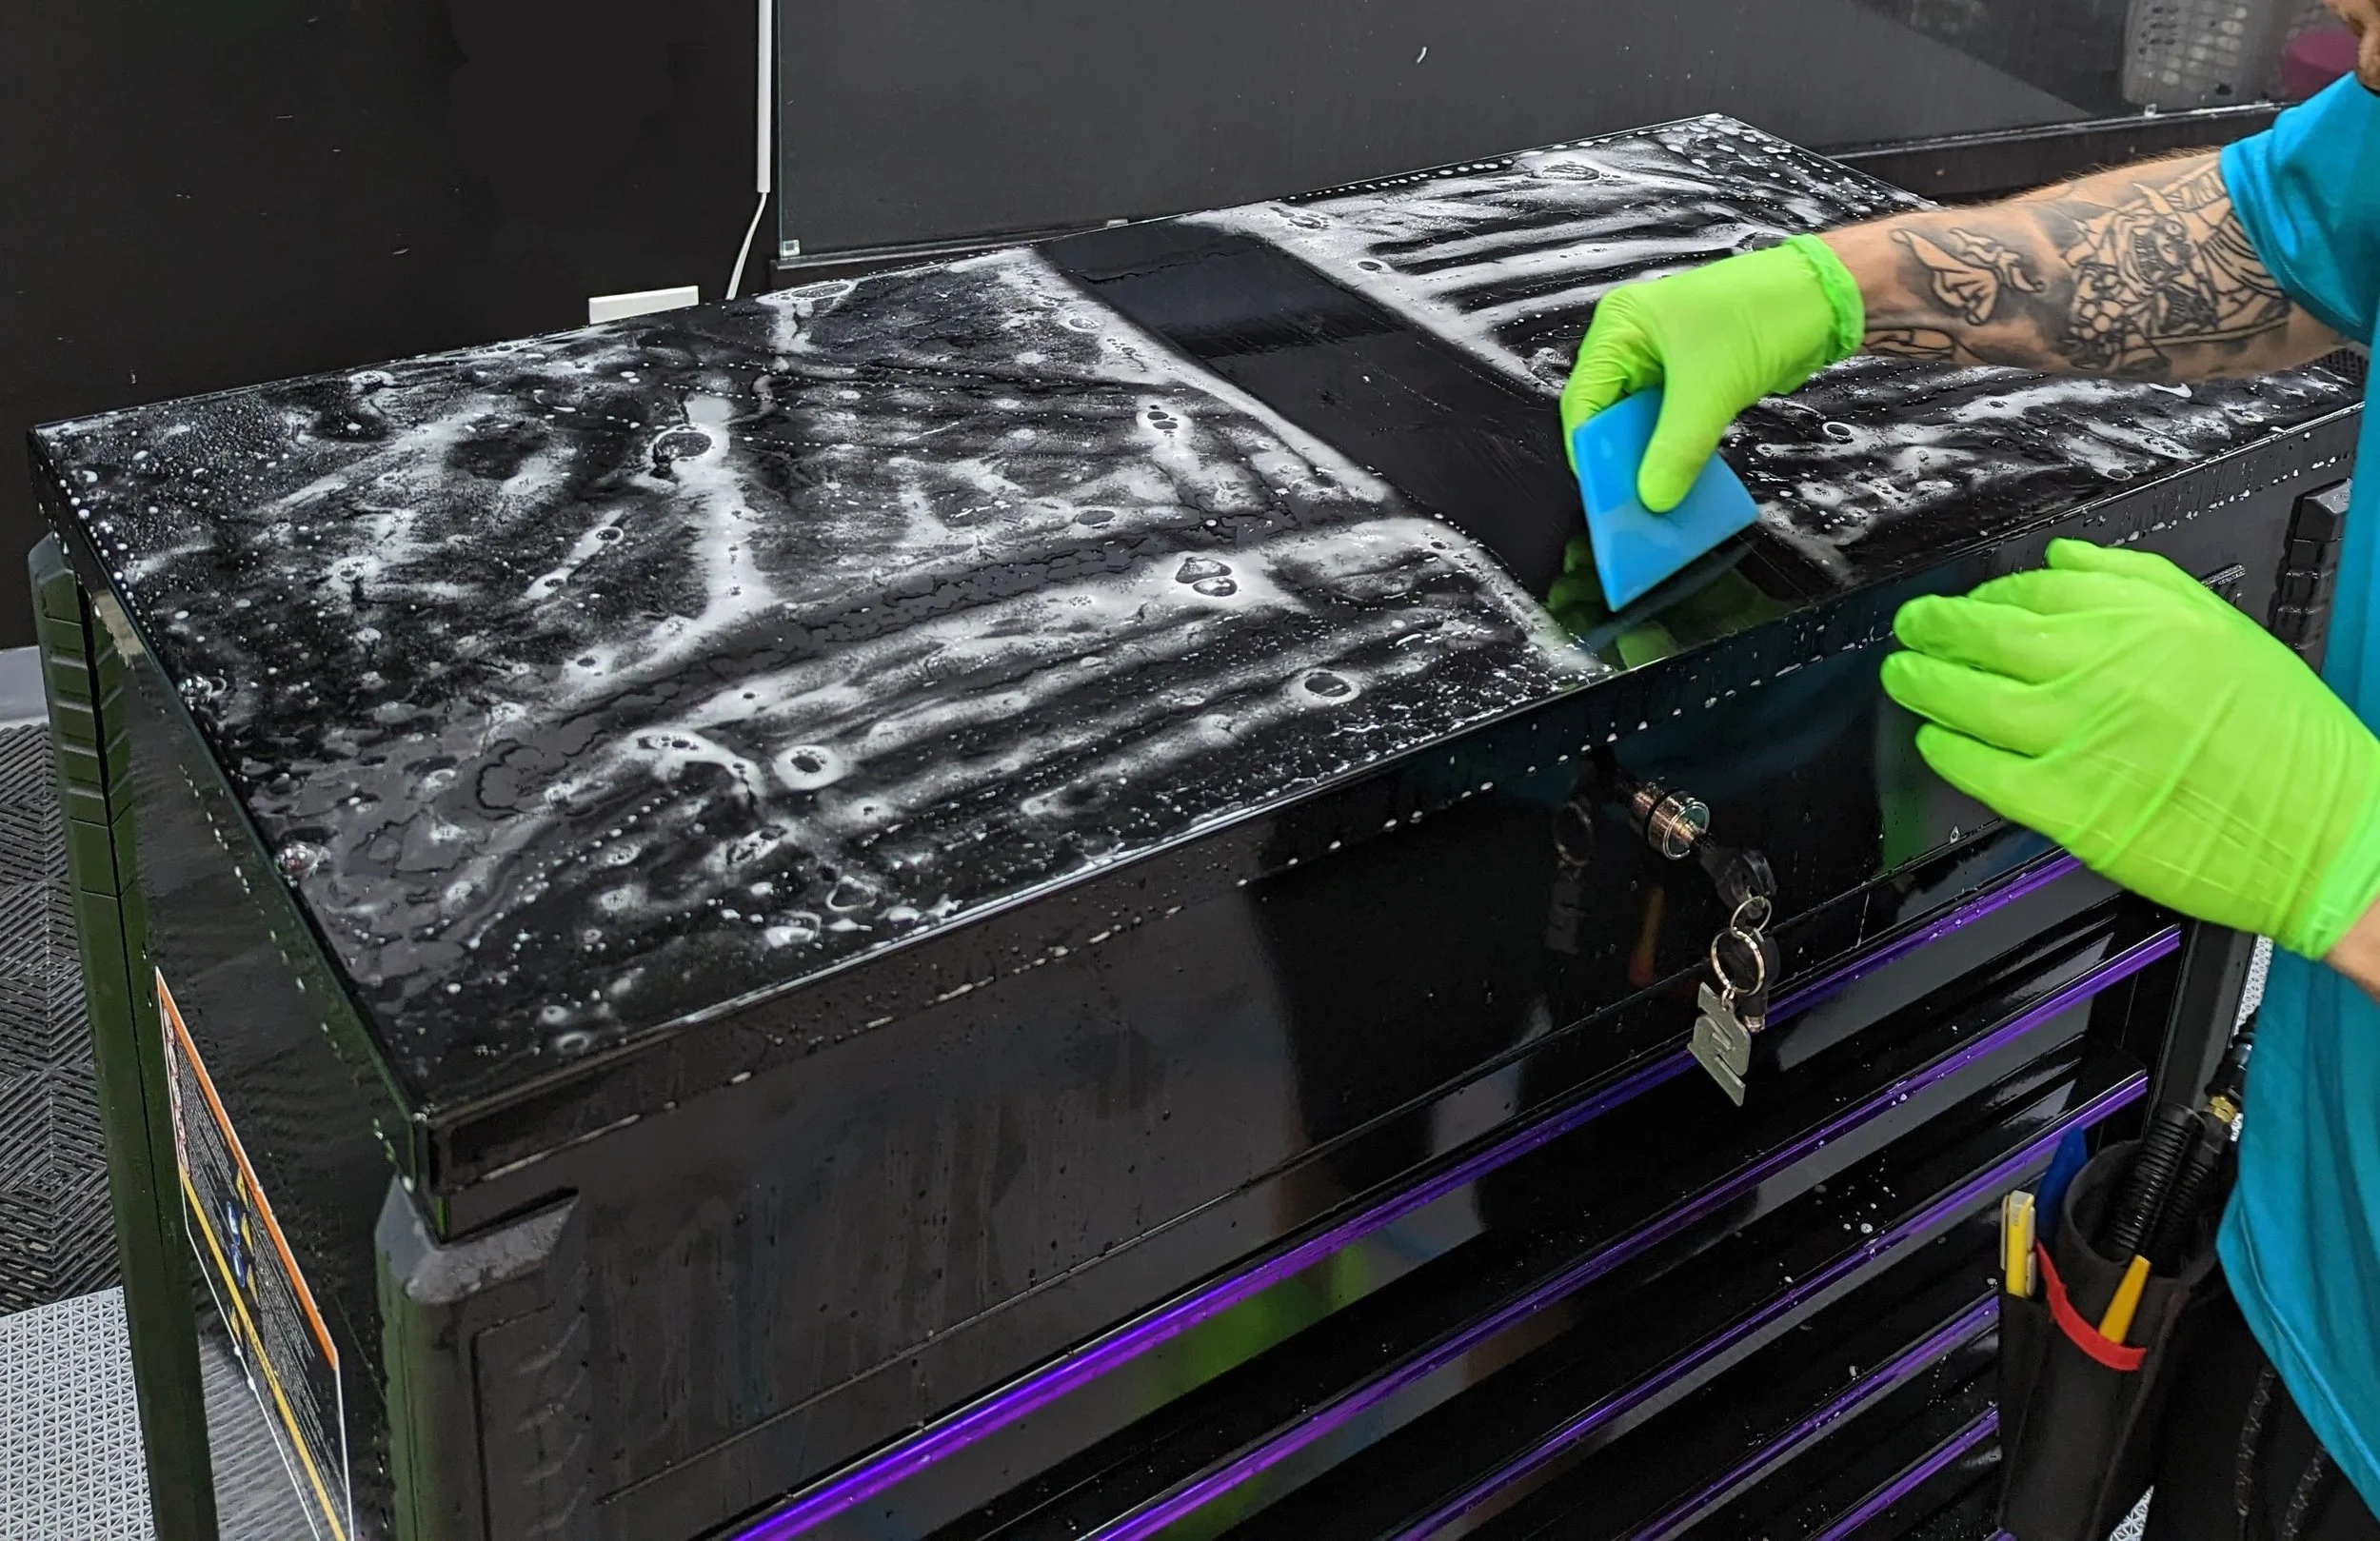
Installing Paint Protection Film on a toolbox drawer face is very manageable when you take your time, keep everything clean, and use the right installation solution for each stage.
The biggest advantage when working on a drawer face is that you are dealing with a relatively small, flat panel. The key is controlling the film while you position it, locking down your starting point, and then removing the installation solution evenly as you squeegee.
BEFORE YOU BEGIN
For the best results, install your PPF in a clean, well-lit area away from wind, dust, fans, and other sources of contamination.
The toolbox surface should be cool to the touch. Avoid installing on a toolbox that has been sitting in direct sunlight or is excessively warm.
You will need:
Your Bulldog Protection Films pre-cut PPF piece
A squeegee — Bulldog premium Squeegee recommended for cleaner installs
Clean microfiber towels
Slip solution — Bulldog Drool™ Installation Gel recommended for easier, more controlled installs
Tack solution
Spray bottles
Clean water
Isopropyl alcohol for final surface preparation
Clean hands
Important: Dirt, lint, dried wax, polish, grease, or fingerprints underneath the film can become permanently visible after installation. Cleanliness is one of the most important parts of a professional-looking installation.
UNDERSTANDING YOUR INSTALLATION SOLUTIONS
Different solutions perform different jobs during a PPF installation.
SLIP SOLUTION
Slip solution allows the adhesive side of the PPF to temporarily move across the surface of the toolbox.
It is primarily used when you first place the film onto the drawer face.
The slip solution gives you time to:
Position the PPF
Align edges
Center the pattern
Move the film without immediately activating the adhesive
Lift and reposition an area when necessary
A traditional PPF slip solution is generally made using clean water with a very small amount of installer-approved soap or slip concentrate.
The exact concentration can vary depending on the film, water, temperature, and installer preference.
Too little slip: The film may grab the toolbox too quickly.
Too much slip: The adhesive may have difficulty beginning to bond.
You want just enough lubrication that the film moves freely while you are positioning it.
TACK SOLUTION
Tack solution does almost the opposite of slip solution.
It is used when you want the adhesive to begin grabbing the toolbox surface more aggressively.
Tack solution is especially useful for:
Locking down your first anchor point
Securing corners
Holding edges
Finishing areas that continue to lift
Flushing excess slip solution away from the adhesive
A typical tack solution uses clean water combined with an appropriate amount of isopropyl alcohol.
Because alcohol concentration and film adhesives can vary, always avoid making the solution unnecessarily strong. More alcohol does not automatically mean a better installation.
Use tack solution strategically rather than covering the entire panel with it.
BULLDOG DROOL™ INSTALLATION GEL
This is where we make the installation easier.
Bulldog Drool™ is designed to give you greater control over the film during installation.
Traditional slip solution works well, but water moves quickly. It can run down vertical surfaces, disappear from the area you are working on, and sometimes leave the film grabbing before you are ready.
Bulldog Drool™ gives the installer a more controlled working layer between the PPF and the toolbox surface.
That means:
More controlled film movement
Easier positioning
More time to make small alignment adjustments
Less uncontrolled runoff
Better lubrication under the squeegee
Reduced tendency for the film to prematurely grab
A more forgiving installation experience
For someone installing PPF for the first time, that extra control can make a major difference.
Think of Bulldog Drool™ as your positioning assistant.
It helps keep the film manageable while you get everything exactly where you want it.
Premium BULLDOG SQUEEGEE
Your installation solution controls how the film moves. Your squeegee controls how that solution comes out.
That is why we recommend pairing Bulldog Drool™ Installation Gel with the premium Bulldog Squeegee.
The premium Bulldog Squeegee is the primary installation tool used to press the PPF into place while pushing Bulldog Drool™, slip solution, water, and trapped air toward an open edge. Its purpose is to give you the firm, controlled pressure needed for clean, overlapping passes without turning the installation into a fight with the film.
Used together, the two products have very different jobs:
Bulldog Drool™ keeps the film controllable while you position it.
The premium Bulldog Squeegee gives you control while setting the film.
Tack solution helps lock the film down when you are ready.
For a first-time installer, this combination makes the process much easier to understand: get the film where you want it, then use the right tool to progressively remove the installation solution and set the adhesive.
STEP 1 — WASH YOUR HANDS
Start with thoroughly washed hands.
PPF adhesive is extremely sensitive to contamination.
Avoid touching the adhesive with dirty or oily fingers.
Even after washing your hands, try to handle the PPF primarily by the edges whenever possible.
STEP 2 — CLEAN THE DRAWER FACE
Thoroughly clean the entire drawer face.
Remove:
Dirt
Dust
Grease
Wax
Polish
Ceramic spray products
Detail sprays
Silicone residue
Fingerprints
Pay particular attention to:
Drawer edges
Corners
Around emblems
Handle areas
Seams
Contamination hiding near an edge can easily get pulled underneath the PPF during installation.
Once the surface is clean, perform a final wipe using an appropriate isopropyl-alcohol cleaning solution and a clean microfiber towel.
Allow the surface to completely dry.
STEP 3 — TEST-FIT THE PPF
Before removing the liner, place the pre-cut PPF over the drawer face.
Familiarize yourself with:
Top edge alignment
Bottom edge alignment
Left and right edges
Handle openings
Emblem openings
Corners
Any relief cuts
This lets you understand exactly where the film belongs before exposing the adhesive.
Do not stretch the film simply to make it reach an edge.
Our patterns are designed around the intended toolbox surface. Correct positioning should come primarily from alignment—not excessive stretching.
STEP 4 — APPLY YOUR SLIP SOLUTION OR BULLDOG DROOL™
Generously wet the drawer face.
Then carefully remove the PPF liner while keeping the adhesive side clean.
Apply slip solution to the adhesive side of the film as the liner is removed.
For additional control, apply Bulldog Drool™ Installation Gel to the drawer face and/or adhesive side according to the product directions.
You want a lubricated working surface underneath the PPF.
Do not be afraid of having adequate installation solution underneath the film at this stage.
You will remove it with the squeegee.
STEP 5 — PLACE THE PPF ON THE DRAWER
Lay the PPF onto the drawer face.
At this point, the film should be able to move.
Do not immediately begin pressing everything down.
First, position the film.
Check your alignment at several points.
Do not judge alignment from only one edge.
Look at:
Left side
Right side
Top
Bottom
Openings
Corners
Make small adjustments until the pattern sits naturally on the drawer.
This is one of the biggest benefits of Bulldog Drool™.
Instead of fighting film that wants to immediately grab the surface, you have additional working time to get your placement right.
STEP 6 — FIND YOUR STARTING POINT
Once everything is aligned, choose an area near the center of the drawer to create your first anchor.
The goal is to establish one stable reference point before working toward the outer edges.
Lightly lift the film in your chosen anchor area.
Use tack solution to flush away some of the slip solution or installation gel underneath that section.
Lay the film back down.
Using your premium Bulldog Squeegee, make a short, firm pass to secure the film. Hold the squeegee at a comfortable working angle and use controlled pressure rather than simply pushing as hard as possible.
You now have your anchor.
Do not try to tack down the entire drawer at once.
STEP 7 — SQUEEGEE FROM THE CENTER OUT
Once your center anchor is secure, begin working outward.
Use the premium Bulldog Squeegee with firm, controlled, overlapping strokes.
Push the Bulldog Drool™, slip solution, water, and air toward the nearest open edge.
A good pattern is:
Center → outward
rather than:
Edge → inward
Every squeegee stroke should have somewhere for the liquid underneath the film to escape.
Maintain firm, controlled pressure and keep the working edge of the premium Bulldog Squeegee moving smoothly across the film. The goal is to move the installation solution out with each pass rather than merely pressing the film downward.
Overlapping your strokes helps prevent narrow channels of trapped liquid from remaining between passes.
STEP 8 — KEEP THE SQUEEGEE LUBRICATED
Keep the top surface of the PPF wet while squeegeeing.
A dry squeegee dragged across dry film can leave unnecessary marks. Keep the film surface lubricated so the premium Bulldog Squeegee can glide smoothly instead of dragging across the PPF.
A light mist of slip solution or Bulldog Drool™ can help your squeegee move smoothly across the film.
Remember:
Lubrication underneath the film helps with positioning.
Lubrication on top of the film helps the squeegee glide.
This is where Bulldog Drool™ and the premium Bulldog Squeegee work especially well as a system: Drool gives you working control, while the squeegee gives you setting control.
STEP 9 — WORK ONE SECTION AT A TIME
Do not rush.
Work the drawer in manageable sections.
For example:
Establish the center.
Complete the left-center section.
Complete the right-center section.
Work toward the upper edges.
Work toward the lower edges.
Finish the corners and perimeter.
Continually watch where the installation solution is moving.
You want to push it out—not trap it.
STEP 10 — LIFT AND RESET IF NECESSARY
If you notice:
A large air pocket
A fold
A trapped piece of contamination
Incorrect alignment
A major finger or wrinkle
Stop before squeegeeing over it.
If the area has not fully bonded, carefully lift the film back to the problem area.
Reapply slip solution or Bulldog Drool™ as needed.
Correct the issue.
Then lay the film back down and squeegee the area again.
Do not simply force a major wrinkle flat with the squeegee.
Resetting the film usually produces a much better result.
STEP 11 — LOCK DOWN THE EDGES
Once the main center portion of the drawer is installed, begin finishing the perimeter.
The edges require less slip and more adhesion.
If an edge continues to move or lift:
Carefully lift the edge.
Flush some of the remaining slip solution or Bulldog Drool™ away.
Apply a small amount of tack solution.
Lay the edge back into position.
Squeegee firmly toward the edge.
Hold briefly if necessary.
This allows the adhesive to begin making stronger contact with the toolbox.
STEP 12 — FINISH THE CORNERS
Corners are generally the last areas you want to secure.
Trying to permanently lock the corners too early can restrict the rest of the film and make alignment more difficult.
Once the surrounding film is properly positioned:
Remove excess installation solution.
Apply tack solution where necessary.
Carefully lay the corner into place.
Squeegee outward.
Avoid unnecessary stretching.
The goal is for the film to sit naturally.
STEP 13 — PERFORM A FINAL SQUEEGEE PASS
After the entire piece appears installed, go over the panel again.
Use firm, overlapping strokes.
Pay particular attention to:
Edges
Corners
Around openings
Around handles
Around emblems
Any area where you used extra Bulldog Drool™
Any location where you lifted and repositioned the film
Your goal is to remove as much remaining installation solution as reasonably possible.
STEP 14 — INSPECT THE DRAWER
Look at the installation from several angles and under good lighting.
Check for:
Raised edges
Large water pockets
Air pockets
Wrinkles
Contamination
Areas that were missed with the squeegee
Small amounts of moisture or light haziness may remain beneath freshly installed PPF and can improve as the remaining moisture evaporates.
Large pockets should be addressed during the installation rather than intentionally left behind.
STEP 15 — LET THE FILM SET
Once installed, give the adhesive time to settle.
Avoid immediately:
Washing the toolbox
Applying cleaners to the film
Picking at edges
Repeatedly opening and touching freshly installed edges
Applying waxes, sealants, or coatings
Environmental conditions affect drying time.
Cool temperatures and high humidity can cause installation moisture to evaporate more slowly.
THE THREE-SOLUTION APPROACH
For the easiest installation, remember what each product is doing.
SLIP SOLUTION = MOVEMENT
Use it when you need the PPF to slide and reposition.
BULLDOG DROOL™ = CONTROL
Use it when you want smoother, more manageable positioning and greater control over the film while you work.
TACK SOLUTION = GRIP
Use it strategically when you are ready for an anchor point, edge, or corner to begin sticking.
The trick is not choosing one solution for the entire installation.
The trick is using the right solution at the right time.
And once the film is positioned, remember the tool that brings the system together:
Premium BULLDOG SQUEEGEE = CONTROLLED PRESSURE
Use it to progressively push installation solution and air toward an open edge, set your anchor points, work the main face of the drawer, and finish the perimeter with controlled, overlapping passes.
SLIP = MOVE
BULLDOG DROOL™ = CONTROL
TACK = GRIP
premium BULLDOG SQUEEGEE = SET
WHY WE RECOMMEND BULLDOG DROOL™
You absolutely can install PPF using traditional slip and tack solutions.
But controlling a wet piece of film—especially for someone completing their first installation—can be one of the most frustrating parts of the process.
That is exactly why we offer Bulldog Drool™ Installation Gel.
It gives you more control while positioning the PPF and makes the installation process more forgiving.
Instead of fighting film that wants to move too quickly, grab too early, or lose lubrication while you're working, Bulldog Drool™ helps keep the installation manageable.
More control. More working time. Less frustration.
Because installing PPF on your professional toolbox shouldn't require years of installation experience.
Bulldog Drool™ — made to help you get it right the first time.
THE BULLDOG INSTALLATION SYSTEM
We want our DIY kits to be more than a piece of pre-cut PPF in a box. The goal is to give you the products and process that make a professional-looking installation achievable.
That is why we recommend using the system together:
PRECISION-CUT BULLDOG PPF
Made for the specific toolbox surface so you are not starting with a sheet of film and a knife.
BULLDOG DROOL™ INSTALLATION GEL
Helps keep the film manageable and gives you greater control while positioning and working the PPF.
premium BULLDOG SQUEEGEE
Gives you the controlled pressure needed to move installation solution and air out from beneath the film and progressively set the PPF into place.
TACK SOLUTION
Helps you lock down anchor points, edges, and corners when you are ready for the film to grab.
Each part has a job. Together, they make the installation process easier to control from the moment the liner comes off until the final edge is set.
Position it with Bulldog Drool™. Set it with the premium Bulldog Squeegee. Lock it down with tack.